


Winter has a way of making your home’s exterior look like it went a few rounds with a blizzard and lost. Faded paint, peeling trim, cracked caulk, and dingy siding are all pretty normal after months of freeze-thaw cycles and harsh weather. The good news? Spring is prime painting season — and if you do the prep work right, a fresh coat of paint can make your home look like a completely different place.
The catch is that paint is only as good as what’s underneath it. Slapping color on a poorly prepped surface is basically just making the problem prettier for a few months before it peels off. Here’s how to get your home’s exterior ready to actually hold that new look.
Start with a Thorough Inspection
Before you even think about paint colors, walk around your home and take stock of what you’re working with. Look for:
- Peeling or bubbling paint — This usually means moisture got under the surface at some point. The old paint needs to come off before anything new goes on.
- Cracks in the siding or trim — These need to be filled and sealed, or water will just work its way back in and ruin your new paint job.
- Rotted wood — Soft, spongy spots on trim, fascia, or siding boards need to be repaired or replaced before painting. Paint won’t save rotting wood; it just hides it temporarily.
- Gaps around windows, doors, and trim — Old caulk shrinks and cracks over time. Any gaps need to be re-caulked to keep moisture out and give you clean, sharp paint lines.
Taking notes as you go (or just snapping photos on your phone) helps you keep track of everything that needs attention before the painting starts.
Clean the Surface — This Step Is Non-Negotiable
Paint does not stick well to dirty, chalky, or mildew-covered surfaces. Power washing your home’s exterior before painting is one of the most important things you can do for the longevity of your paint job.
A good pressure wash removes:
- Dirt, dust, and grime buildup from winter
- Mildew and mold (common on shaded or north-facing sides of the house)
- Loose, chalky old paint that would undermine adhesion
- Pollen and debris that accumulates even when you can’t really see it
After washing, give the surface adequate time to dry — typically at least 24 to 48 hours — before any paint or primer goes on. Painting over a damp surface is a fast track to peeling.
Repair Before You Paint
This is where a lot of DIY paint jobs go sideways. Homeowners will clean and prime and paint, and then notice the trim is still soft, or there’s a gap around the window frame that’s going to let water in all over again. Doing repairs after the surface is clean and dry — but before primer — is the right order of operations.
Common pre-paint repairs include:
- Replacing damaged trim or fascia boards — If wood is rotted, it needs to come out. Fresh wood, properly primed, will hold paint far better than trying to patch over compromised material.
- Caulking gaps and seams — Use a paintable exterior caulk around window frames, door frames, trim joints, and anywhere two materials meet. This is one of those small steps that makes a big difference in how long your paint job lasts.
- Patching cracks in stucco or siding — Small cracks can be filled, but larger issues may point to underlying problems worth a closer look.
Cransten handles all of these repair and prep tasks — so if you want to go into your paint project with a surface that’s genuinely ready, we can get you there.
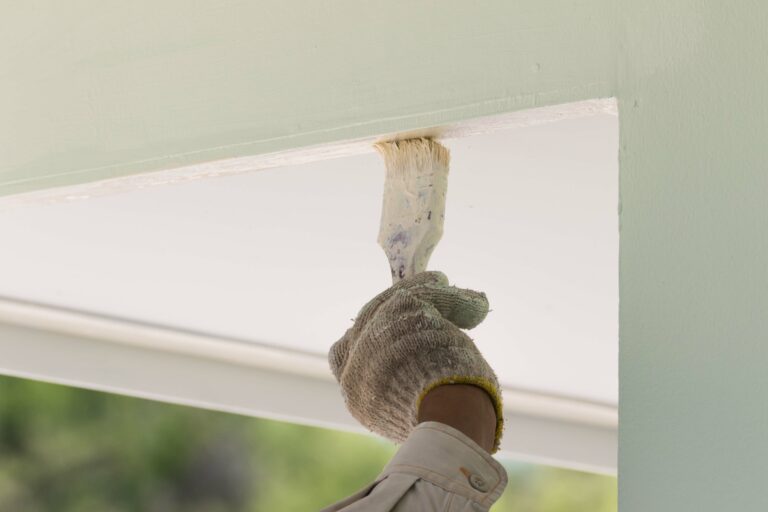
Prime the Right Way
Primer is not optional. It seals the surface, improves paint adhesion, and helps with color coverage — especially if you’re making a significant color change or painting over bare wood or fresh patches.
A few primer pointers:
- Bare wood, repaired spots, and areas where old paint was removed all need primer before topcoat.
- Stain-blocking primer is worth the extra cost in areas where you’ve had moisture issues, tannin bleed, or mildew.
- Let primer dry fully according to manufacturer instructions before applying paint.
Pick the Right Conditions to Paint
Even the best prep work can be undone by painting in the wrong conditions. Exterior paint generally needs temperatures between 50°F and 85°F to cure properly — which is one reason spring is ideal (once the weather stabilizes). Avoid painting in direct hot sun, on windy days, or if rain is in the forecast within 24 hours.
Morning is often the best time to start on most sides of the house — you can follow the shade around the home as the day goes on.
When to Call in Help
Exterior painting prep sounds straightforward until you’re up on a ladder scraping peeling paint off a two-story home while trying to figure out if that soft spot on the trim is serious or not. If your home needs real repairs before it’s ready for paint — rotted wood, damaged trim, failing caulk, or siding issues — that’s exactly the kind of work Cransten Handyman and Remodeling takes on.
We’ll get your exterior in solid shape so that when the paint goes on, it looks great and actually stays that way. Reach out to get a quote on your project and let’s get your home ready for its spring refresh.